 Contact Us
 (877) 248-1631
Understanding what insert damage can tell you about your CNC broaching setup
When a CNC broaching insert is damaged, identifying exactly what happened is an important first step in troubleshooting the operation. Two problems that can look related are a chipped insert and an insert that has pulled out of the holder.
They are not the same failure.
A chipped cutting edge usually points toward an issue with alignment, programming, rigidity, or clearance. An insert that pulls out of the pocket often indicates that the insert was still trapped in the material when the machine attempted to retract. Understanding the difference between chipping, wearing, or set-up or programming errors can help narrow down what needs to be checked before running another part.
What Does a Chipped Broach Insert Look Like?
Chipping occurs when a portion of the carbide cutting edge breaks away. The insert may still be seated correctly in the tool pocket, but the cutting edge will show visible damage.
CNC Broach Tools identifies improper workholding and poor tool alignment as major causes of insert chipping. The insert should be accurately indicated so its cutting orientation is square to the machine axis. Even a small angular error can become more significant at the cutting edge because of the length of the broach tool.
Programming can also contribute to chipping. If the tool changes direction while the insert is still engaged in the keyway, the cutting edge can be exposed to side loading it was not intended to handle.
Other areas to check include setup rigidity and clearance at the end of the cut.
Why Would an Insert Pull Out of the Pocket?
An insert pulling out is a different situation.
CNC Broach Tools designed the insert to release from the tool pocket when there is insufficient relief in a blind slot or the insert becomes trapped during retraction. This can help protect the machine spindle from the forces that would otherwise be transferred through the broach tool.
One of the first things to check is whether the insert completely cleared the material before the machine changed direction.
For a through keyway, CNC Broach Tools recommends programming the cutting edge to travel at least 0.125 inches beyond the end of the material. The tool should then move completely out of the keyway in the X or Y axis before retracting along Z.
If the insert is still engaged when that retract begins, it can stick in the feature and pull out of the pocket.
Check Relief on Blind Keyways
Blind keyways require additional attention because the insert cannot simply travel through the back of the part.
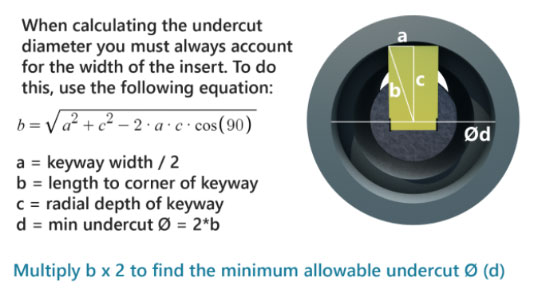
A proper relief feature must provide enough room for the entire cutting edge, including the insert corners, to clear the material before retraction. CNC Broach Tools recommends that the relief extend approximately 0.020 to 0.030 inches beyond the corners of the insert. An example of this can be seen below:
Chip evacuation also matters. Chips that pack into the relief area can reduce the available space until the insert begins striking compacted material. Continued chip packing can contribute to chipping, breakage, or insert pull-out.
Bar-fed applications should also be treated as blind holes until the part has actually been parted off.
Inspect the Setup Before Replacing the Insert
Installing another insert without identifying the cause can result in the same failure happening again.
If the cutting edge is chipped but the insert remained seated, inspect alignment, workholding, rigidity, tool mounting, and the programmed toolpath. Verify that the tool is retracting completely out of the keyway before moving back through the bore.
If the entire insert has pulled out of the pocket, focus on whether the cutting edge had enough room to fully clear the material. Check the programmed endpoint, relief dimensions, chip accumulation, and retract sequence.
Set screws should also be inspected periodically. CNC Broach Tools notes that worn set screws can flatten over time and lose their ability to grip the insert properly.
Let the Failure Point You Toward the Problem
A damaged insert provides information about what happened during the broaching cycle.
Chipping usually means the cutting edge experienced forces it was not intended to handle. An insert pulling out often means the tool attempted to retract while the cutting edge was still engaged or did not have enough relief to escape.
Instead of treating either condition as normal insert wear, inspect the setup and program before continuing production. Finding the reason for the failure can protect the next insert, improve process consistency, and help prevent more serious damage to the broach tool or machine.
